Study and install Pro-discover and Encase free version
Pro-discover
Pro-discover is a software in a digital forensics that helps investigators to acquire the evidence from computer device. Pro-discover is mostly used in digital forensics and incident response. By using Pro-discover tool, we can create a image of any disk drive or storage drive to analyse, discover the data for investigation.
Some key features of Pro-discover includes:
- Preview and Image Disks
- Investigate all filesystems
- Analyse email artifacts and web
- Report generation (hash value or automatic)
- View Internet History
You need to install first Pro-Discover basic software which is available freely. After that opening it, we will see the following launch dialog for creating a new project. Mention the project number and project file name on it and click open button.
Standard format of Project Number is like '001-HDD-1-27-07-2022' and Project File Name is 'SampleDemo-001-HDD-1-27-07-2022'.
Then click on the Capture and Add Image which is in the left hand side panel. One window will open asking for select source drive which you want to capture, here I am going to capture my pen-drive name as Akash. Then select destination folder which you want to store the image file.
Now enter the 'Technician Name', 'Image Number' and 'Description' of it.
If you want compressed image then click on Compression as 'Yes' and for password click on 'Password...'.
Then click on 'OK'.
Then wait for sometime until capturing process gets completed. Time will vary according to your Disk or Drive size.
You can see that the progress bar showing how much drive captured and you can also stop that process by clicking Red Stop Hand button.
After process get finished you will see the small dialog box that show 'Image capture complete. Please check log file for any errors.
Now click 'OK' and then close the Pro-discover and save it to exit.
Then reopen the Pro-discover and open our project and click on the Image you capture which is left panel in the home page of pro-discover tool under the 'Content View'.
You can see that Pro-discover showing the content of captured image. It will be helpful for forensics investigators to find evidences. You can also explore deleted files here.
You can also generate the report of this image by clicking on the 'Report' tab which is under the 'View' menu.
You can see that evidence report is generated.
So, we learnt how pro-discover work in forensics techniques to generates reports.
Encase Forensic
Encase is useful for exploring, decrypting, acquiring and freezing forensic data from various devices which ensure integrity of evidence.
It is mainly useful for:
- Thorough evidence collection: Collect evidence from various sources and go deep into every source to acquire and freeze relevant data for forensics.
- Customizable workflows: Revamp investigation performance with optimized investigator workflows with predefined or customized conditions and filters to quickly locate evidence.
- Comprehensive reporting: Provide detailed evidence which is useful for judges to take decisions.
EnCase Forensic is designed to be used by:
- Those responsible for collecting evidence
- Forensic examiners and analysts
- Forensic examiners who develop and use EnScript code to automate repetitive or complex tasks
With EnCase Forensic these types of investigators can:
- Acquire data in a forensically sound manner using software with an unparalleled record in courts worldwide
- Investigate and analyze data from multiple platforms - Windows, Linux, AIX, OS X, Solaris, and more - using a single tool
- Find information despite efforts to hide, cloak, or delete
- Easily manage large volumes of computer evidence, viewing all relevant files, including deleted files, file slack, and unallocated space
- Create exact duplicates of original data, verified by hash and Cyclic Redundancy Check (CRC) values
- Transfer evidence files directly to law enforcement or legal representatives
- Review options that allow non-investigators, such as attorneys, to review evidence with ease
- Use reporting options for quick report preparation
To get started with a triage case, the pathway suggests three steps:
- Create a case
- Add evidence
- Apply a hash library to your case
Steps
- On the home page in the Pathways group, click Preview/Triage.
- The Preview / Triage page displays. You can follow the steps for the case you have open, or you can start a new case by clicking
- Create a New Case.
- Once you create a case, the next step is to add evidence to it. Back on the Preview/Triage page, click Add Evidence to Your Case. The Add Evidence dialog displays.
- Click the appropriate link and follow the instructions to perform any of the available add evidence actions.
- On the Preview/Triage page, click Apply Hash Library to Your Case.
- The Apply Hash Library to Case dialog displays.
 |
| Preview Window |
 |
| Start Window |
Using a Case Template to Create a Case
After installing and configuring EnCase, you can create a new case with an EnCase supplied case template. Following are instructions for creating a new case with a case template. After you create a case, most of the EnCase features and their navigation paths become available.
You begin creating a case under the FILE category of the Home tab.
To create a new case:
- Click New Case beneath the CASE FILE category on the Home tab.
- The Case Options dialog displays. Use this dialog to select a case template and name the case.
- In the figure below, the #1 Basic template is selected.
- Enter a case Name, then click OK.
 |
| Case Template |
 |
| Add Evidence |
Taking Backup:
The dashboard shows a list of all available case backups and sorts them by the following types:
- Custom: This is a user created backup where you can provide a custom name and comments. Custom backups are retained until explicitly deleted.
- Scheduled: A scheduled backup is created when you open a new case or schedule a backup manually using the Create Scheduled option.
- Daily: Every scheduled backup that is closest to that day’s local midnight time is copied and stored as a daily backup.
- Weekly: Every daily backup that is closest to that week’s Sunday local midnight time is copied and stored as a weekly backup.
Types of Evidence Files:
EnCase Forensic supports the following evidence file types:
- EnCase evidence files (.E01 or .Ex01)
- Logical evidence files (.L01 or .Lx01)
- Raw Image files
- Single files
 |
| Add Image |
Verifying Evidence Files
Verify Evidence Files checks CRC values of selected files. It is a way to ensure that evidence is not tampered with. Verified CRC information is written out to a log file. From the Evidence tab, you can check the CRC Errors tab in the bottom pane and bookmark any sectors that contain errors.
To perform an Evidence File verification:
- Acquire the evidence files.
- Add the evidence files to your case.
- Click Tools > Verify Evidence Files.
- The Verify Evidence Files dialog displays.
- Select one or more evidence files, then click Open. During verification, a progress bar displays in the lower right corner of the window.
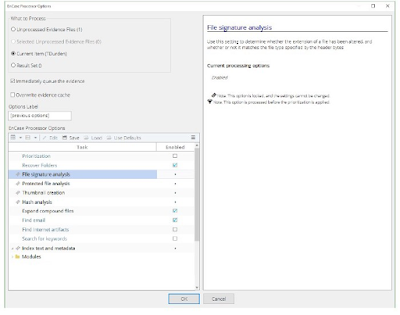
Evidence Processing
 |
| Processing of Evidence |
 |
| Hash Analysis |
Finding Email:
Select this setting to extract individual messages and attachments from email archives. Find Email supports the following email types:
- PST (Microsoft Outlook)
- NSF (Lotus Notes)
- DBX (Microsoft Outlook Express)
- EDB (Microsoft Exchange)
- EMLX (Macintosh OS X)
- AOL
- MBOX
Note: EnCase blocks MBOX files from displaying in the Doc tab. This setting prepares email archives for the use of email threading and related EnCase email functionality during case analysis.
To select which email archive types to search:
- Click Find Email.
- Click the email archive file types whose messages you want to examine, and click OK. After processing completes, EnCase can analyze the messages and component files extracted from the email archives, according to the other Evidence Processor settings you selected.
Handling Email Attachments:
When EnCase finds an attachment to an email message, it displays an attachment paper clip icon on top of the message icon. However, when email systems append a plain text version of the email together with the HTML/rich text version (this text is called an “alternate body”), EnCase displays a standard email icon. This occurs only when the alternate body is the only attachment to the email message.
Finding Internet Artifacts
Choose this Evidence Processor setting to find Internet-related artifacts, such as browser histories and cached web pages. The only setting that you can configure for Find Interne Artifacts is whether to search within unallocated space.
Currently, six browsers and two types of Internet history are supported. They are:
- Internet Explorer: History and cache
- Macintosh Internet Explorer: History and cache
- Safari: History and cache
- Firefox: History and cache
- Opera: History and cache
- Google Chrome:
- History: A list of websites recently visited. This typically consists of websites, usage, and time related data.
- Cookies: A list of recent authentication and session data for sites with persistent usage. This typically consists of website, expiration times, and site specific cookie data.
- Cache: A list of recently cached files.
- Downloads: A list of recently downloaded files. This typically consists of websites, file names, location, size, and date.
- Keyword Search: A list of recent keyword searches. This typically consists of search terms and the search result page.
- Login Data: A list of login data. This typically consists of websites, username, password, and SSL information.
- Top Sites: A list of top websites. This typically consists of website information, rank, thumbnails, and redirect information.
Note: EnCase does not provide the ability to recover Google Chrome Internet artifacts from unallocated clusters.
Note: The difference between a regular search and a search of unallocated is that keywords are added internally and marked with a special tag indicating that it is for Internet history searching only.
Firefox Artifacts
As an enhancement to the Search for Internet history function, EnCase parses Firefox artifacts stored in a SQLite database and displays them in the Artifacts tab.
The types of Firefox 3 artifacts parsed are:
- Cookies
- Downloads
- History
- Bookmarks
- Form data
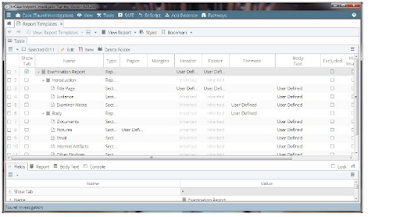
Generating reports
 |
| Report generation |
To add new Reports or Sections to the template:
- Highlight the row above the new element you want to add. Right click and select New from the dropdown menu.
- The New Report Template dialog opens.
- Enter a Name.
- Select a Type (Section or Report).
- If you want to customize Format styles, check the appropriate boxes, or leave the boxes clear to use the default styles.
- Click OK. The new template component displays below the row you highlighted.
Encase can also be used to retrieve data from Mobile Devices and laptops and various hard drive disk.


Comments
Post a Comment